
Documentation
Introduction

Welcome to the documentation for Lyricue
The current version of this document can be seen at http://www.lyricue.org/documentation (unless you are already there, in which case this is the most recent version)
Installation
Current Version: 4.0.4-1
The easiest way to download/install is using the PPA repository for Ubuntu To do this open a terminal and run the following commands.
sudo apt-add-repository ppa:chris-debenham/lyricue
sudo apt-get update
sudo apt-get install lyricue
If you are not running Ubuntu then choose the release series that is the closest match to your system or install from source
- Source package: lyricue_4.0.4-1.orig.tar.gz
Manual Installation
For installation of Lyricue on non-debian based distributions follow these 4 easy steps.
Note: If you wish to upgrade the process is exactly the same
-
Make sure you have mysql and perl installed
Lyricue is written in perl and holds all its data in two mysql databases so you will require perl/mysql to be installed. To download these go to http://www.perl.com and http://www.mysql.com or just install them from your distributions install disks. Lyricue also requires a few perl modules such as Gtk2, Clutter and DBI.
These may already be installed or you can install them from CPAN or your install disks.
2.Download the main Lyricue program
Lyricue is available at <http://www.lyricue.org/downloads>

Download the source package which will be named
lyricue\_\<version\>.tar.gz where \'\<version\>\' is the current
version.
3.Extract the files
To extract the main program run: tar xvfz
lyricue\_\<version\>.tar.gz
4.Install using './configure' and 'make'
Change into the directory that was created by tar then run:

    $ ./configure
          $ make
          $ make install

This script will install the program in /usr/bin with the shared
components in /usr/share/lyricue and default settings in
/etc/lyricue
First-run Wizard
To load the interface run 'lyricue' or select 'Lyricue' from the Applications menu.
On first load it will bring up the 'First-run Wizard'. This dialog will step you through the process of setting up Lyricue to run
If you have already set up Lyricue it will skip straight to the main screen
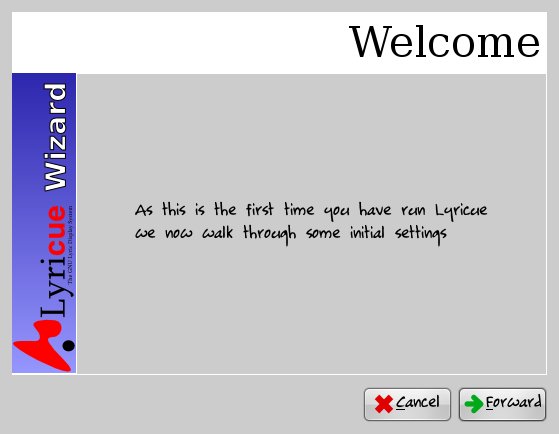
Click 'Forward' to advance through the wizard
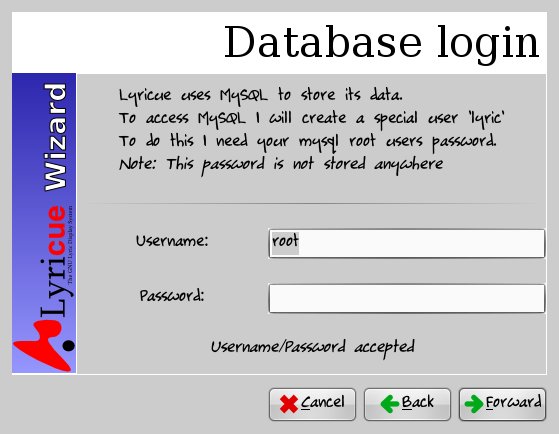
First-run Wizard - Login
The first thing to configure is the administrators mysql login which will be used to create the nessecary database tables and the 'lyricue' mysql user.
The user chosen must have full access to the database. This user is normally called 'root' and has no password by default.
Note: this user is different to the 'root' login on the computer
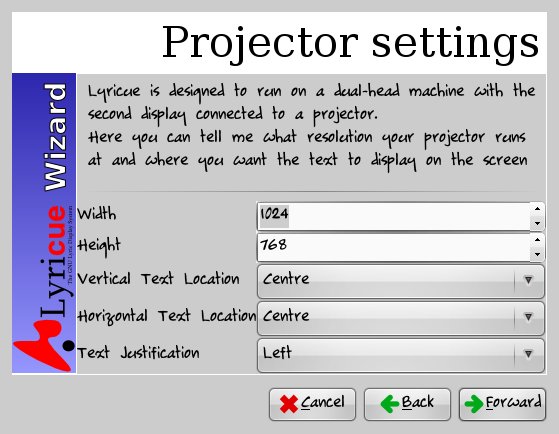
First-run Wizard - Projector Settings
Here you can do some basic setup of how the projector screen will look.
Setting the width and height will help with ensuring the previews look correct.
You can set where the main lyrics will display on the screen (at the
top/centre/bottom and left/centre/right of the screen) as well as what
the text justification is.
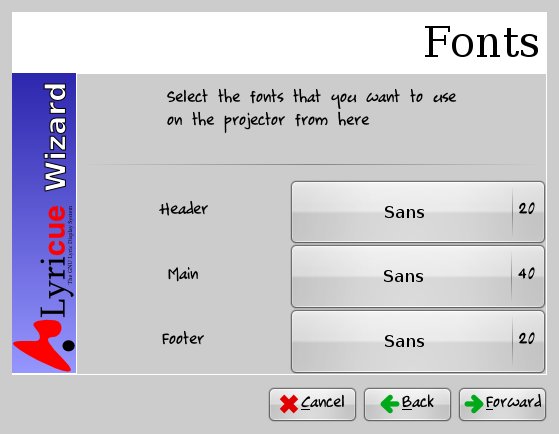
First-run Wizard - Font Settings
Here you can specify the fonts used by the header, lyrics and footer
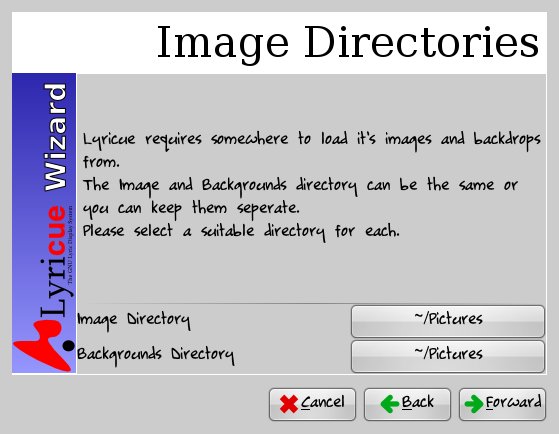
First-run Wizard - Image Directories
From here you can specify where the images and videos used by lyricue are stored.
Each sub-directory of whatever location you specify will show up as a seperate 'category' in Lyricue
You can set the directories as the same or seperate locations. This can help you to keep images and videos unsuitable for use as backgrounds seperate.
If you are going to be running the interface and the server on separate machines these paths must be the same and accessible on both machines. Sharing the directory as an NFS share is the best method of doing this. It is recommended that the directory be shared from the server machine if you are going to be using videos.
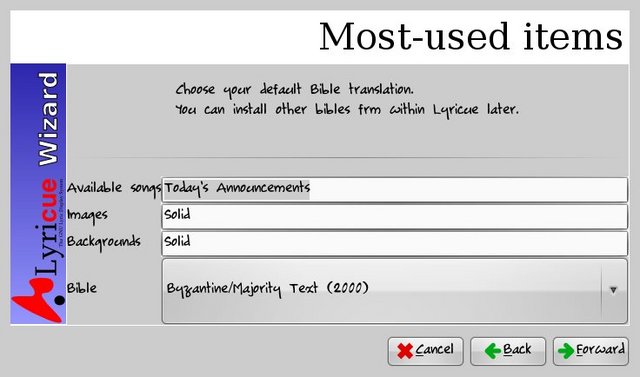
First-run Wizard - Most-used Items
Here you can enter the items that you want to always appear at the top of their respective lists.
You can also select your default bible translation.
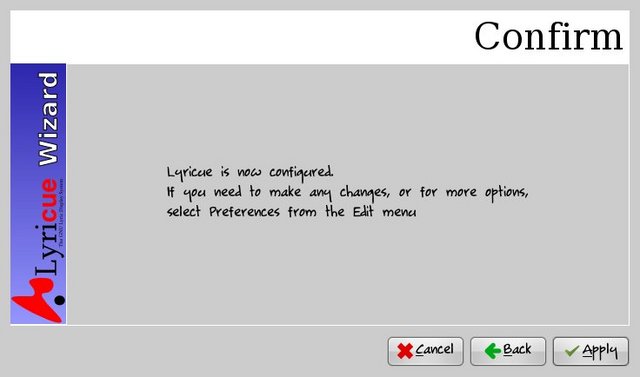
First-run Wizard - Confirm
You are all done.
Now you can continue to the main interface of Lyricue
Lyricue interface
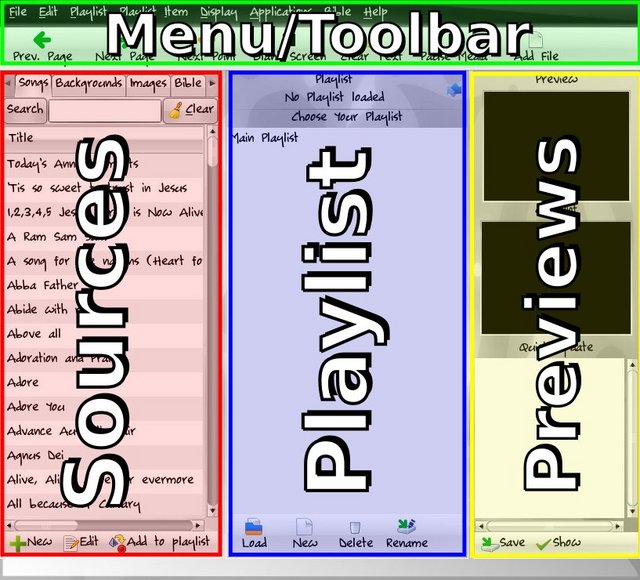
To load the interface run 'lyricue' or select 'Lyricue' from the Applications menu. If you are running on a dual-screen system then run this on your primary display (not the one connected to the projector) The main interface is broken up into four areas.
- Menu and toolbar
- Sources
- Playlist
- Previews
When Lyricue is loaded it also adds a group of five buttons to your notification tray which provide quick control of the server even if you are not showing the main interface at that time.
The first thing you will want to do is choose a playlist
Playlist Selection
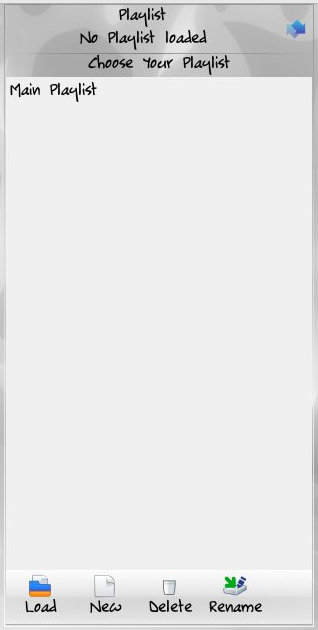
If no playlist is loaded the middle section shows a list of available playlists.
From here you can create new playlists and load,rename or delete existing playlists.
Double-clicking on a playlist will load it or you can select the playlist then click "Load"
Using the Playlist
At the top of the playlist area is the name of the current playlist and a 'refresh' icon.
Underneath that the playlist is shown as a hierarchical tree view. Wherever you see a small triangle at the start of a line you can click on it to expand that item.
At the bottom of the playlist area are a number of toolbar buttons. They are
- Move selected item up
- Move selected item down
- Remove selected item from playlist
- Add a new sublist
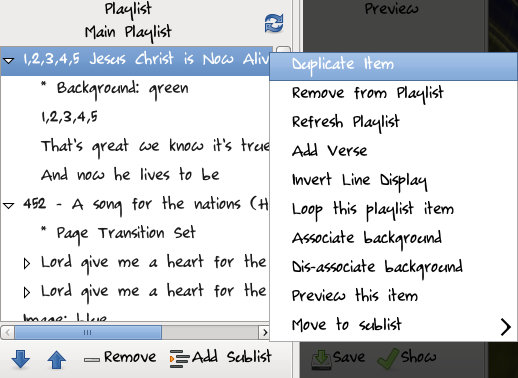
You can also right-click on an item in the playlist to bring up a context-sensitive menu.
- Duplicate Item
- Remove from Playlist
- Refresh Playlist
- Invert Line Display
- Loop this playlist item
- Associate background
- Dis-associate background
- Move to sublist
Using the Sources area
Lyricue can source playlist items from a variety of locations.To assist in adding to/modifying items on the playlist the 'Sources' area is split into five tabs.
Songs
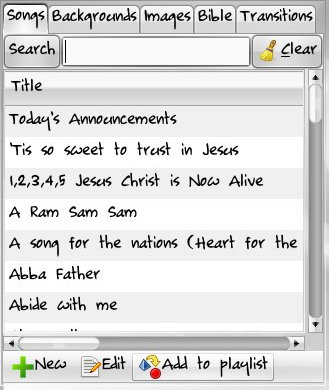
This tab contains a list of all songs that are currently available to add to the playlist.
At the top of the tab is the search entry. Any text you enter here will cause the playlist to be filtered to only show songs containing those characters in their title, or in the first line of the song (this is helpful for when you can't remember the proper name of the song but can remember how it starts)
You can click the Search button to bring up a dialog from which you can search the lyrics themselves as well
At the bottom of the tab are three buttons which allow you to create a new song, edit the currently selected song or add the selected songs to the playlist.
You can also right-click on an item to bring up a context-sensitive menu which provides the following options
- Edit Song
- Delete Song
- Refresh List
- Order - Songbook -> No. / Order - Songbook -> Name.
- Add to playlist
Backgrounds
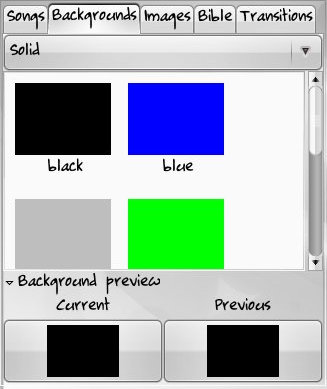
The Backgrounds tab displays a list of available images and videos that can be used as backgrounds which are displayed behind the text on the screen.
At the top of the area is a selection box that can be used to choose which category you want to view.
Once a category is selected the main area will fill with a list of all available files. Images will display a thumbnail of the image while videos will just show the filename.
You can double-click on an item to set it as the current background immediately.
You can also drag an item onto a playlist item in order to associate the file with the target playlist item. Then whenever that playlist item is shown the background will be automatically changed at the same time.
At the bottom of the screen is the Background preview area which shows the current and previous background. This can be helpful for quickly changing the background back.
Images
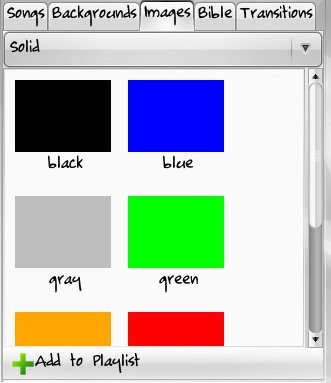
The Images tab displays a list of available images and videos that can be used as standalone items in the playlist.
At the top of the area is a selection box that can be used to choose which category you want to view.
Once a category is selected the main area will fill with a list of all available files.
Images will display a thumbnail of the image while videos will just show the filename.
You can click the 'Add to Playlist' button to that the selected item to the end of the current playlist.
You can also drag an item onto a playlist to add it.
When an image/video is added as a standalone item it will clear any text on the screen when shown.
Bible

The Bible tab is used to add bible verses to the playlist.
To use you can either type a verse directly or click on the provided buttons to browse for a certain verse.
If you type a verse directly it will automatically complete the bookname to the first matching book (ie - enter 'Ge' and it will assume you mean Genesis)
Verses should be entered in the format 'book chapter:startverse-endverse'
You can also click the buttons under the verse-entry area to select a book/chapter and verse.
On either side of the verse-entry area there is a left and right arrow. Clicking on either of these will cause Lyricue to automatically go back/forward one verse. When this is done it will also trim the number of verses shown to ensure they all fit on the screen.
At the bottom of the Bible tab are three buttons
- Add to playlist
- Show
- Autoshow
You can change the current bible translation viewed/displayed via the "Bibles" menu.
Transitions
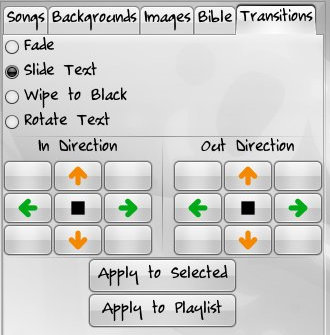
The transistions tab allows you to change how text is changed on the screen.
When you select an item in the playlist this tab will update to show whatever transition is currently applied to that item.
There are four transitions available:
- The default transition is 'Fade' which will cause the text to fade from one page to the next
- The Second transition is 'Slide Text' which will cause text to slide in/out of the screen in the direction specified by the buttons which will be display in this tab once this option is chosen.
- The third transition is 'Wipe to Black' which does nothing currently
- The final transition is 'Rotate Text' which will cause the text to rotate around the axis specified by the buttons which will be displayed in this tab once this option is chosen.
You can choose to apply the selected transition to only the selected item, or to the entire playlist in one go.
When applied to a selected item it will also apply to any children of that item. This means you can set the transition type for a song and it will apply for all pages in that song
Using preview area
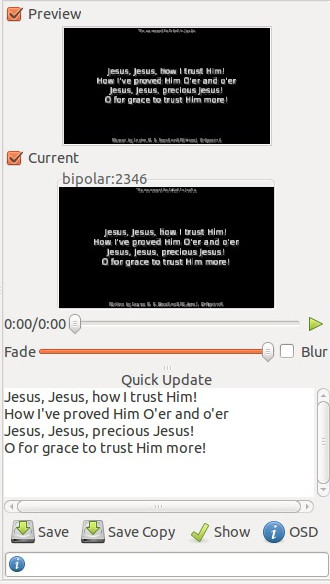
The preview area contains four sections:
- Preview window
- Miniview windows
- Quick update area
- On screen display area
The preview window contains a small preview of the item you click on in the playlist.
It can be used to check how a playlist item will look, if the text will fit and/or how the background/image looks.
The miniview window contains a duplicate of whatever is being displayed on the server. This is helpful when the projector screen is not easily visible. If there are multiple projector screens then multiple miniviews will be displayed
Only the first three seconds of videos will be played in the preview or miniview as performance is impacted too much.
The preview and miniview can be enabled/disabled in the preferences dialog or by clicking on the checkbox above each section
The quick update area is used to make immediate changes to a song, or to quickly put any text on the screen. When a playlist item is selected it's contents will be copied into this area. The area is editable and so you can edit a page and click 'Save' to quickly correct errors in the page. The 'Save Copy' button is used to save the changes in a copy of the page - allowing you to modify a page for just this playlist (rather than updating the song itself for all future uses)
You can also put any text you want in this area and click 'Show' to quickly show that text on the server screen.
Finally the OSD area can be used to type a quick message which will be scrolled across the bottom of the displays
Adding content
Lyricue supports the display of songs, images, videos, bible verses and text. This content can come from a variety of sources. Songs and text are stored in a database allowing for quick searching, display and updates. You can either type each song in individually, import one of the provided song packages or import individual songs that have been exported from other lyric applications. Image and videos can come from anywhere and sit on the computer. Bible verses can be provided by the Sword project or in Lyricue's own database format
Adding an individual song
To add a new song you can either choose 'Add Song' from the 'Edit' menu or click 'New' in the song tab.
This will bring up a dialog at which you can enter a new song or import a single song.
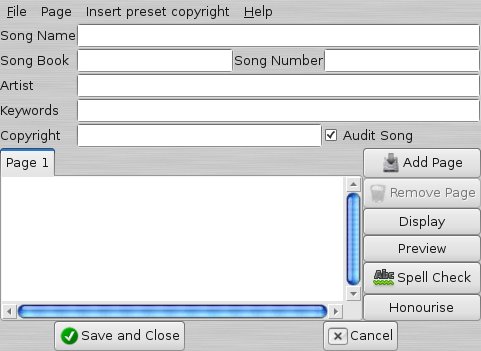
Creating a new song
The new song dialog allows you to create a new song by simply filling in the text fields with the relevant information.
You can add/remove pages by the buttons on the right
You can also show the page currently being currently edited on the server, or preview screen.
There is also the option to spell check your text and 'Honourise' the song (which changes 'jesus' to 'Jesus' and similar common capitalisations)
The check box 'Audit Song' allows you to enable/disable auditing of this song to control if its usage will show up in the reports (these reports can be generated by precue)
There is a menu labelled 'Insert preset copyright' which will display a list of pre-made copyright strings (These are set in ~/.local/share/lyricue/config2). When one is selected a string such as 'Preset:1' will be added to the 'Copyright' field. When this song is displayed on the server this string will be replaced with whatever you have specified for that preset. This is helpful to add the same copyright information to all songs - and if the copyright changes you don't have to edit all the songs again. For example 'Used with permission CCLI 999999'
Once the song is finished click 'Save and Close' to save the new song and return to the main interface.
If you decide not to save the new song click 'Cancel'
Importing a single song
You can choose 'Import' from the file menu to import a file from any of the supported file formats.
Currently Lyricue supports:
- Lyricue .xmlz format
- Old Lyricue .txt format
- Songbeamer .sng format
- Songselect .usr format
- Opwekking .opw format
- Opensong .html format
Once you have chosen a suitable file this dialog will be filled with the information from that file. At this point you can edit it as required and then save the new song
Importing songs
The quickest way to add songs to Lyricue is to import a songlist from http://www.lyricue.org/songlists
The importing of songs from other formats is done song-by-song on the 'Add song' screen.
Then go to the 'File->Import Songlist' menu item. This will bring up the following screen
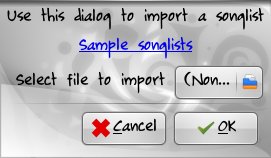
At this screen you can select the previously downloaded file.
Once you have accepted this you will be taken to the following screen from where you can choose which individual songs you wish to import.
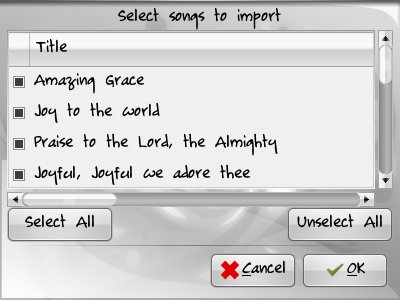
Once you have chosen the ones you want click OK to add them to your available songs
Bible Verses
Lyricue can load bible verses from either via it's own SQL format, or any sword bible module
Sword Format
Lyricue can use bible translations from the Sword project as long as you have a small utility called 'diatheke' installed. If diatheke is installed any sword bibles installed will show up automatically without configuration. You may need to add/install the 'diatheke' tool from your package manager
Sword bibles are also used by Bibletime and Gnomesword/Xiphos
The most common method is to download from Crosswire.org.
The Sword project provides a number of bible translations in a number of different languages. When downloading from there please use the 'Raw ZIP' download.
Your distribution may also provide pre-made packages for some bible texts.
In the case of Ubuntu and Debian the packages are named 'sword-text-*'. On other distributions they may be named differently.
Lyricue Database Format
Lyricue can import bibles in it's own SQL-based format.
- MySQL_create_bible_KJV.sql.gz - King James Version
- MySQL_create_bible_MES.sql.gz - The Message
- MySQL_create_bible_NIV.sql.gz - New International Version
- MySQL_create_bible_NIV_uk.sql.gz - New Internation Version - UK English
- MySQL_create_bible_NIRV.sql.gz - New International Readers Version
- MySQL_create_bible_NLT.sql.gz - New Living Translation
- MySQL_create_bible_NRSV.sql.gz - New Revised Standard Version
- MySQL_create_bible_GNT.sql.gz - Good News Translation
- MySQL_create_bible_NASB.sql.gz - New American Standard Bible
Installation from within Lyricue
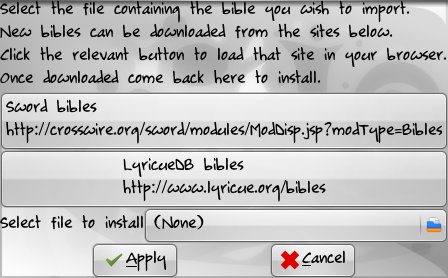
With the release of Lyricue 2.0 the option was introduced to install bibles from within the interface.
To use select "Install New Bibles" from the "Bible" menu. From there you can import a Lyricue SQL format or Sword format bible that you have previously downloaded
How to install Sword format automatically
Your distribution may also provide pre-made packages for some bible texts.
In the case of Ubuntu and Debian the packages are named 'sword-text-*'. On other distributions they may be named differently. Install using your distributions usual package manager. You will also need to ensure that the 'diatheke' package is installed.
How to install SQL format Manually
To install a bible translation download one of the files listed below and then run
gzip -dc bible.sql.gz | mysql -uroot -p
Replace bible.sql.gz with the file you downloaded previously.
This should ask for your mysql root user password then install the bible. The next time you run lyricue it will be in the list of available bibles. If your MySQL install does not require a password for the root user remove the -p from the command above.
How to install Sword format Manually
To install a sword format manually run
unzip bible.zip -d ~/.sword
Replace bible.zip with the file you downloaded previously. You will also need to ensure that the 'diatheke' utility is installed.
Importing Images, Backgrounds and Videos
Importing images, backgrounds and videos is simply a matter of copying them into folders under your image/background directories.For example, if you set your Images directory to be /home/user/Pictures then any folders inside that folder would show up in Lyricue as categories.To create a new category you can create a new folder within /home/user/Pictures with the name that you can to give that category/group of images.To add images to a category you can simply copy any valid image file to one of these created folders. Videos are treated exactly the same as an image.The same applies for managing backgrounds.
Using the Server
After configuring lyricue's interface, you should start up the server:
Starting the server manually
By default there is a menu item under Applications labelled Lyricue Server. Click this to load the server.If such a menu item is not available open a terminal, drag it to your second monitor and type lyricue_server. Keep the mouse on that monitor until the server is up and running so that the window manager will place the lyricue server window on the screen where your mouse pointer is. A more long-term solution is creating a shortcut to lyricue server on your second monitor, pointing to /usr/bin/lyricue_display
Start the server automatically.
It can be handy to have lyricue_server load automatically when the user logs in. This might be easier for unexperienced users. How this is done depends on your desktop environment.
Generally you can edit ~/.xinitrc and add
display=:0.1 /usr/bin/lyricue_display &
to just above where your desktop is loaded (generally just above the last line) and then lyricue_server will automatically run on the second screen (for when you are using xinerama) when you login.
Keyboard shortcuts
The server screen understands a number of keyboard shortcuts
- Left/Page Up - Go to the previous page
- Right/Page Down - Go to the next page
- Up/Prior - Go to the previous song
- Down/Next - Go to the next song
- 0/b - Blank the screen
- p - Pause any video
- Q - Quit the server
Advanced Tips
Controlling the server with global hotkeys
Lyricue comes with a small utility called lyricue_remote
If you bind keys to lyricue_remote with various command-line arguments in order to control the server.
The main options are prev_page, next_page, prev_song, next_song and blank
If you are using Gnome with the metacity window manager then run the following commands and those options will be bound to the keys F5, F6, F7. F8 and F9 respectively. This has the advantage of working even if the interface is not running
#!/bin/sh
gconftool-2 --set /apps/metacity/global_keybindings/run_command_1 --type String "F5"
gconftool-2 --set /apps/metacity/global_keybindings/run_command_2 --type String "F6"
gconftool-2 --set /apps/metacity/global_keybindings/run_command_3 --type String "F7"
gconftool-2 --set /apps/metacity/global_keybindings/run_command_4 --type String "F8"
gconftool-2 --set /apps/metacity/global_keybindings/run_command_5 --type String "F9"
gconftool-2 --type string --set /apps/metacity/keybinding_commands/command_1 "lyricue_remote prev_page"
gconftool-2 --type string --set /apps/metacity/keybinding_commands/command_2 "lyricue_remote next_page"
gconftool-2 --type string --set /apps/metacity/keybinding_commands/command_3 "lyricue_remote prev_song"
gconftool-2 --type string --set /apps/metacity/keybinding_commands/command_4 "lyricue_remote next_song"
gconftool-2 --type string --set /apps/metacity/keybinding_commands/command_5 "lyricue_remote blank"
Running the server and interface on separate machines
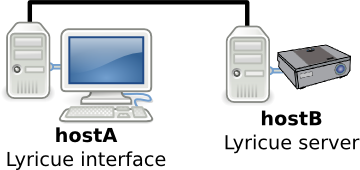
Lyricue supports running the interface and server on separate machines.For instance you can have a computer running the server connected to your projector and then display the interface on a separate computer sitting elsewhere. This can even work with running the interface on a wireless tabletpc, netbook or laptop.The easiest way to do this is to run both the interface and server on one computer, but use the X-forwarding capability in SSH to forward the interface from the server machine to the client machine.To do this you can run 'ssh -X user@server /usr/bin/lyricue' which will ssh to the host server as user and run the interface. The interface will come up on your local machine.The problem with doing it this way is that there is no way to add a file to the playlist that is stored on the local machine. This can make it difficult to do things such as importing presentations.
The other option is to run the interface directly on the local machine.
There are a few restrictions on this though.
- The lyricue package must be installed on both machines
- Both server and interface must be able to access the directories used for /images/backgrounds
- The directory path of the /images/backgrounds must be the same
- MySQL must be configured to listen on the network interface, not just locally
The first thing to do is ensure that MySQL is setup for remote access as by default it is normally only setup for local access. MySQL should be setup/installed on the server (hostB).To do this check your /etc/mysql/my.cnf and ensure you don't have either of the following:
bind-address = 127.0.0.1
skip-networking
If either of these exist, then remove them and restart the mysql server.
The next thing to do is to ensure that both machines can access the same image/background directories.To make this easier you should use the same username to login on both machines and share the home directory between computers. The easiest way to do this is via NFS.If you are planning on displaying videos it is strongly recommended that you share the directory from the server computer to the interface computer.
There are many ways to do this, but the simplest is log into the server machine (hostB) to install nfs-kernel-server and edit /etc/exports. In that file add a line such as:/home/user *(rw,async)Then run exportfs -a to export that directory as an NFS shareNow go back to the interface computer (hostA) and mount that directory as your home directory.To do this edit /etc/fstab and add a line such as:hostB:/home/user /home/user nfs rw,bg,soft,async,intr 0 0That will mount the share from hostB over /home/userChange the server hostname and username as required.You should now restart the interface machine so that nothing is accessing the old home directory and the new home directory is mounted from NFS.
Once the directory is shared between computers you can specify where the lyricue server and mysql server are located by adding command-line arguments when running lyricue using the '-r' option to say where the mysql server is running.
For example run lyricue -r hostB on the interface computer and just lyricue_server on the server computer.